Understanding Nodes and Handles in Locale
Introduction to Nodes and Handles
In Locale, workflows are built using nodes and handles, which are essential components for creating complex and dynamic automation processes. Nodes represent the individual blocks within a workflow, while handles are the connection points that allow data to flow between these nodes.
Nodes
Nodes are the fundamental building blocks of a workflow in Locale. Each node represents a specific function or step within the workflow. There are three main types of nodes:
Types of Nodes
- Triggers: These nodes initiate the workflow. Each workflow starts with a single trigger node, which could be an event-driven trigger (like a new message in Slack) or a scheduled trigger (like polling a database at regular intervals).
- Actions: Action nodes perform specific tasks such as sending an email, posting a message, or generating AI content. They carry out the primary operations defined in your workflow.
- Flow Controls: These nodes help manage the flow of execution within the workflow. They include tools like:
- Conditional Branching (If Conditions): Direct the workflow to different branches based on specified conditions.
- Delays: Introduce pauses in the workflow to delay the execution of subsequent nodes.
Handles
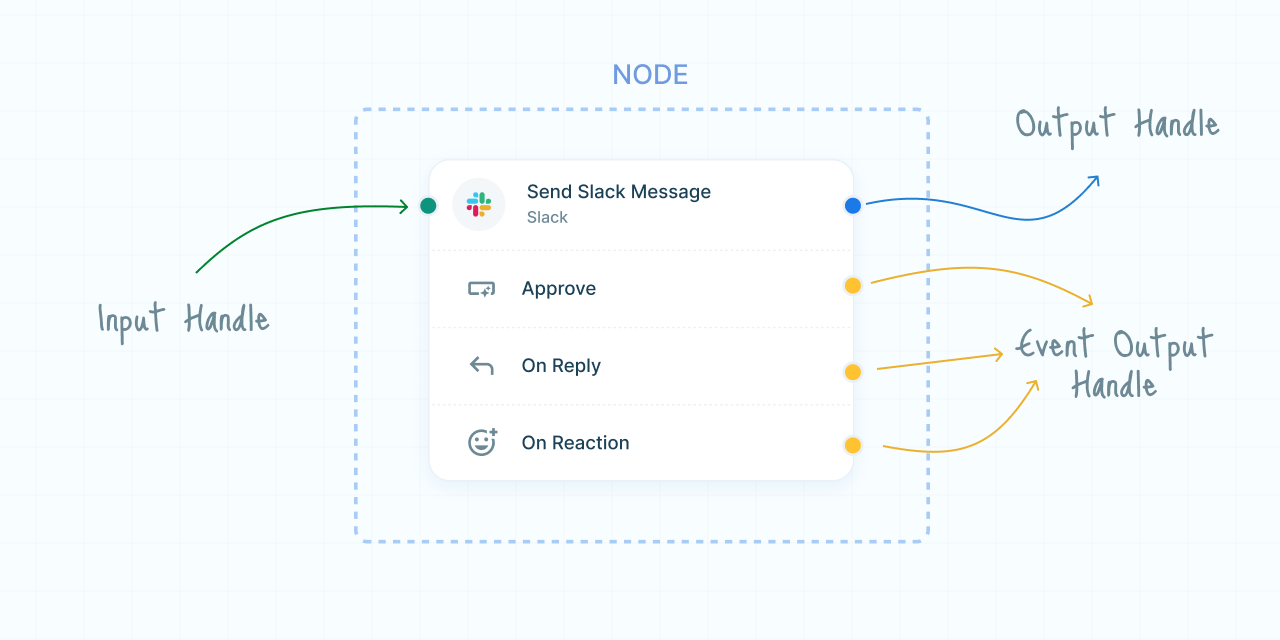
Handles are the connection points on nodes that allow users to link actions and triggers together, facilitating the flow of data through the workflow. Each node contains input and output handles, which are color-coded for easy identification.
Types of Handles
- Input Handles (Green): These handles allow users to connect inputs to a node. They are used to feed data into a node from a preceding node in the workflow.
- Output Handles (Blue): These handles allow users to connect the output of a node to the next node. They are used to pass data from one node to the subsequent node in the workflow.
- Event Output Handles (Yellow): These handles are created for specific events within an action node. They function similarly to standard output handles but are event-specific, allowing the workflow to branch out based on different events.
Connecting Nodes with Handles
To build a workflow, you connect nodes using handles. This process ensures that data flows smoothly from one step to the next, allowing for complex and conditional operations within your workflows.
How to Connect Nodes
- Identify Input and Output Handles: Look for the green input handles and blue output handles on the nodes you want to connect.
- Drag and Connect: Click on an output handle (blue) and drag to the input handle (green) of the next node. This creates a connection and establishes the data flow.
- Multiple Connections: You can connect multiple nodes to a single input or output handle, allowing for branching and merging workflows.
- Event-Specific Connections: Use the yellow event output handles to create branches that are triggered by specific events within an action.
Example Workflow Using Nodes and Handles
Scenario: Automated Customer Support
- Trigger Node (New Ticket in Zendesk): This node triggers the workflow whenever a new support ticket is created.
- Action Node (Assign Ticket): Connect the trigger node's output handle (blue) to the input handle (green) of this action node, which assigns the ticket to a support agent.
- Flow Control Node (Conditional Branch): Use a conditional branching node to check the ticket priority. Connect the action node's output handle (blue) to the input handle (green) of the flow control node.
- High Priority Branch: If the ticket is high priority, connect the conditional branch's output handle (blue) to another action node that sends an immediate alert to the support team.
- Low Priority Branch: If the ticket is low priority, connect to a delay node that waits for an hour before sending a follow-up reminder.
- Event Output Handle: If there is an event within the "Assign Ticket" action (like a ticket reassignment), use the yellow event output handle to trigger an additional notification action.
Benefits of Using Nodes and Handles
- Modularity: Break down workflows into manageable blocks that can be easily configured and reused.
- Flexibility: Create complex workflows with conditional logic and branching to handle various scenarios.
- Clarity: Visualize the entire workflow, making it easier to understand and manage.
- Event-Driven: React to specific events within actions, enabling dynamic and responsive workflows.
Need Help?
If you have any questions or need assistance with using nodes and handles in Locale, our support team is here to help. Visit our Help Center or contact us directly at support@locale.ai.
By mastering the use of nodes and handles in Locale, you can design sophisticated workflows that automate your business processes with precision and flexibility. Explore the possibilities and start building your workflows today!